

Foysonis WMS User Guide
Foysonis and Foysonis WMS are trademarks of Foysonis LLC. All other trademarks are the
property of their respective owners and should be treated as such.
Acknowledgement: This product includes software developed by the Apache Software
Foundation (c) 1999-2004 The Apache Software Foundation. All rights reserved.
Foysonis LLC.
16 W. Martin St
STE 1006
Raleigh NC 27601
U.S.A
Setup / Administration
Setting up a warehouse in Foysonis involves creating the areas, locations and then the items. Once these base data are setup, users should verify the put away and allocation area configuration has been setup right. After that you should be able to receive and ship products from Foysonis. Outside of the Foysonis software, you need to make sure that you barcode your location, and able to use a pre-printed LPN label to attach to pallets or cases when you receive to scan the barcode and track it in Foysonis.
Area setup
Setting up a warehouse in Foysonis requires users to create locations and areas matching the
warehouse layout. By default, there is one default area created when a user signs up for the
Foysonis application. Every warehouse operations has their unique setup, but primarily a
warehouse will have two types of areas, one is a reserve storage area, where products will
be
stored but won't be used for picking products. That will be done in a dedicated pick face
area. If
pick face products are emptied out, then users would have to go to the reserve storage areas
and
locations to replenish products to the pick face area. But if the warehouse is small, then
all areas
and locations will be used as a pick face area.
To add or change areas, from the left navigation, select "Administration → Locations &
Areas" (This
is accessible only for Admin users).
Area Attributes
"Location and Areas" screen displayed below will let users add the type of storage area, storage restriction, picking level restriction, and replenishment area when a user adds or edits an area in your warehouse.
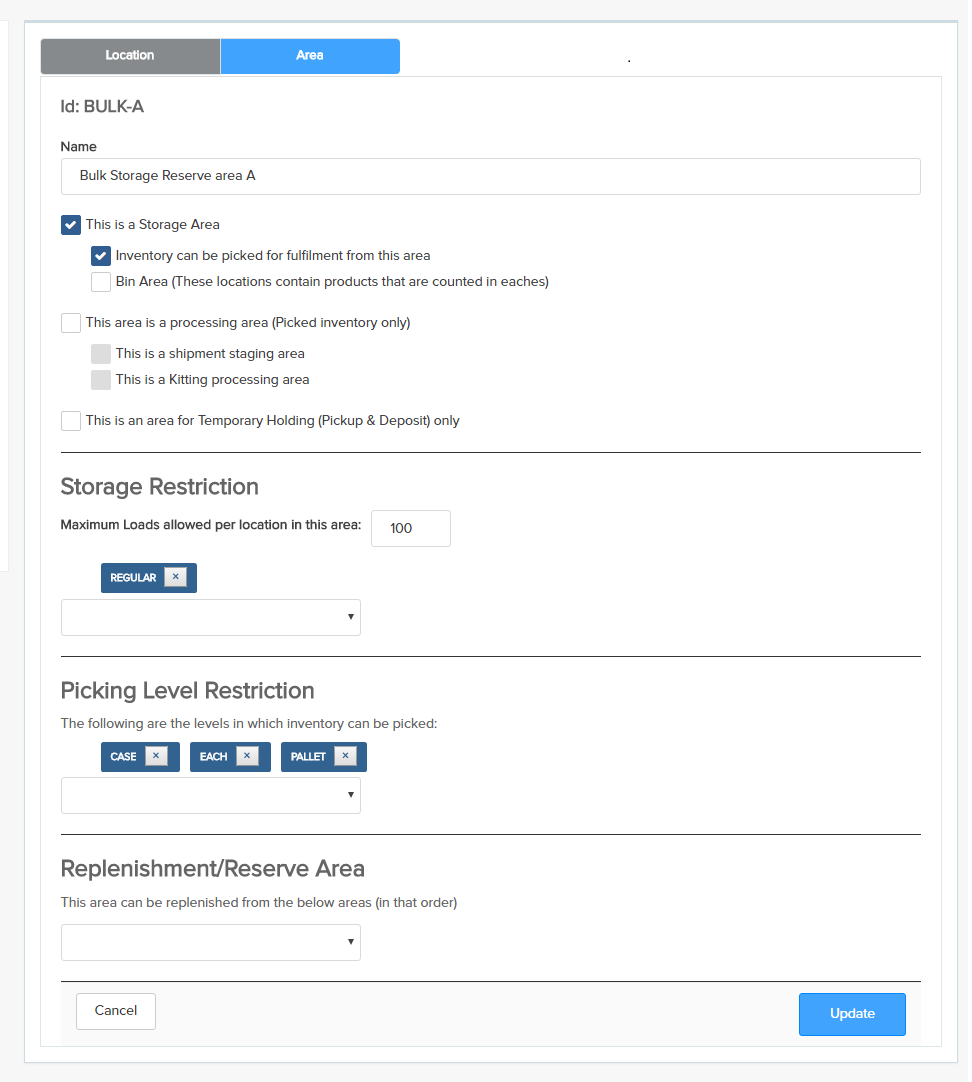
Area Fields and Description
| Id | This is the area identifier to uniquely identify an area in a warehouse. No spaces or dashes allowed, just letters and numbers. |
| Name | This is the full description of the area in a warehouse. |
| Storage Area |
Checking this flag will make an area a storage
area where users can store products in a
warehouse. Inventory can be picked for fulfilment from this area Checking this flag will make this area a pick face area where products will be picked for fulfilling orders. Bin Area (These locations contain products that are counted in eaches) Checking this flag would make this area to store products in eaches and any CaseId/PalletId lose their identifier when products are stored. |
| This area is a processing area (Picked inventory only) |
Checking this flag can make an area be used for
special processing area for performing any
quality checks, wrapping a pallet, kitting or
shipment staging area. This is a shipment staging area Checking this flag would make an area a shipment staging area. |
| This is an area for Temporary Holding (Pickup & Deposit) only | Storage attribute matched between an area and item ensures products are putaway to the right area. Storage attributes are use defined. For example, user can define a "Frozen" storage attribute that would then direct "Frozen" items to be stored in "Froze" area. This is a very simple putaway concept, but gives users unlimited powers to setup a warehouse putaway operation. |
| Storage Restriction: Maximum Loads allowed per location in this area | Limit the number of loads that could be stored in a location. |
| Storage Restriction: Storage attribute dropdown | Limit the number of loads that could be stored in a location. |
| Picking Level Restriction: The following are the levels in which inventory can be picked | Defines how users can pick a product from an area/location. Different picking levels are pallet, case and each. |
| Replenishment/Reserve Area: This area can be replenished from the below areas (in that order) | Defines a replenishment area to feed products to a pick-face area. |
Item Setup
Users can add items using the Items screen from the Admin menu. This will let users define
unique item id, description, uom and other attributes for an item.
To access Items, from left navigation go to "Administration → Items".

Item Data Import in Bulk
You can easily import a large list of items into Foysonis by entering the item data in a CSV file template. Here is the CSV template to use for item import. Use can click on the "CSV Item Import" button as shown below to upload the file to Foysonis.

Item Attributes
| Item Id | This is a unique id for the item in the warehouse |
| Item Description | Full description for an item in the warehouse |
| Item Category | Groups items by category for reporting purpose |
| Lowest UOM | The lowest possible unit of measure for tracking the inventory of an item |
| Is Lot Tracked Status? | If you want to track the lot code for an item you can turn this flag on |
| Is Expired? | This will enable tracking expiration date for an item in the warehouse |
| Do you want to track case id? | This will let you track each individual case with an identifier in a pallet or if you just receive as a case you can track unique identifier for the case. |
| Origin Code | The origin country code for the item |
| Each Per Case | This is the number of eaches in a case |
| Case Per Pallet | This is the number of cases in a pallet |
| UPC Code | The UPC product code for an item |
| EAN Code | The EAN product code for an item |
| Storage Attribute | Storage attribute determines in which area the item would be stored in the warehouse. Foysonis looks at the Storage attribute for an Area and Item, and if it matches will then store products in that area. Storage attributes are user defined. For example, user can define "Frozen" as a storage attribute for an area, and then assign that to an item. After that system would store all "Frozen" items in the "Frozen" area. |
| Re-order level Qty (In Lowest UOM) | System will use this value to generate a report that shows which items in the warehouse needs products to be reordered. |
Receiving & Putaway
Receiving is the process by which inventory is brought into a warehouse and put away into storage locations. Users need to create a receipt with the information about the items going to be received into the warehouse. Once the receipt information is entered, the system will let users create the inventory and then store it in a system suggested location or a location selected by the user. Each receipt will have receipt lines detailing the item, expected quantity and UOM. As items are identified and received, the system will update the received quantity in the receipt line.
The receiving process involves the following steps
STEP
01
Create receipt with
information about items going to be received
STEP
02
Identify products and give a
pallet id or case id for the inventory
STEP
03
Putaway the pallets or cases
to storage location
STEP
04
Close the
receipt
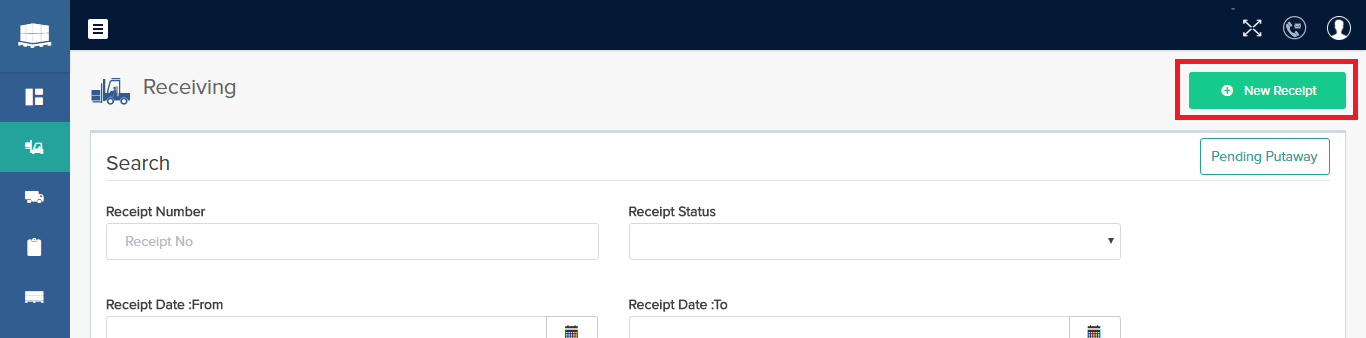
To access Receiving, click "Receiving" from left navigation.
Create Receipt
Users can create a new receipt by clicking on the "New Receipt" button shown below. It will open up a sliding new receipt form to enter the receipt information.
Find Receipt
You can search for the receipt by entering the receipt number, receipt status, and date range.
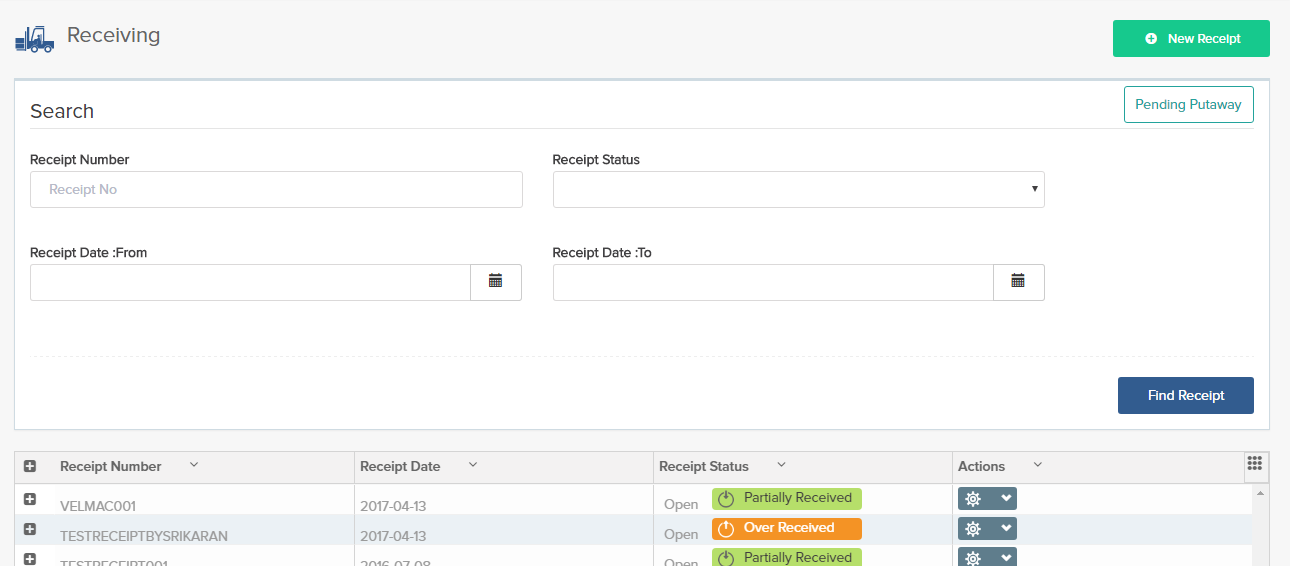
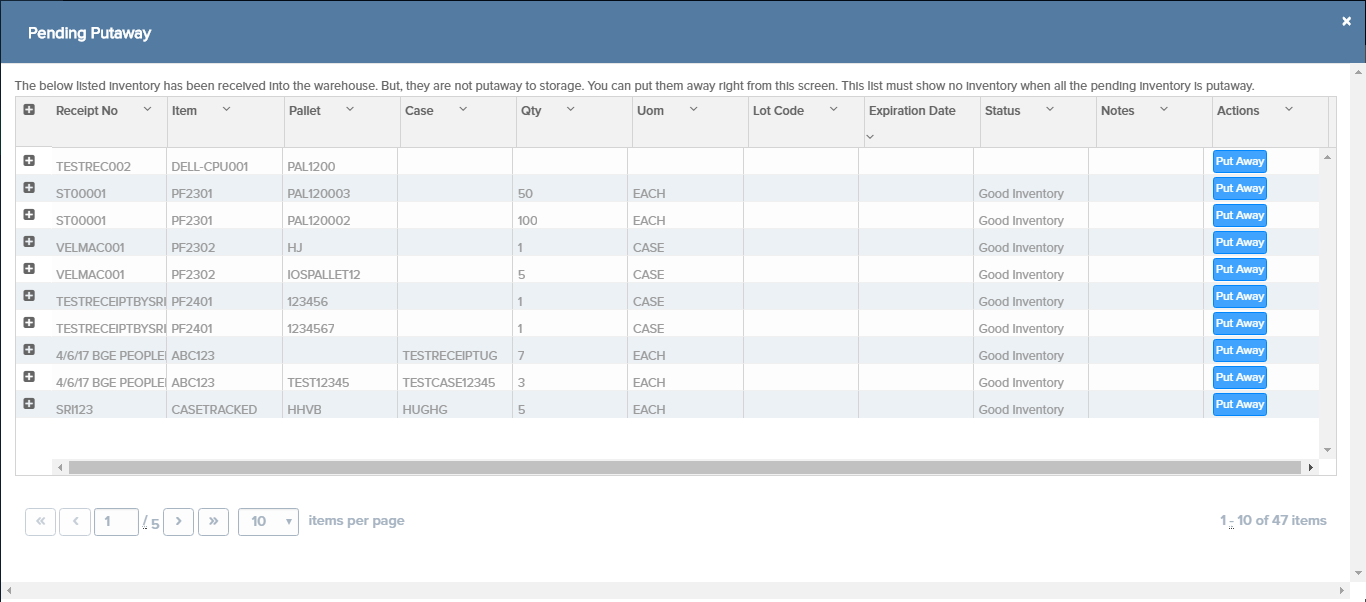
Pending Putaway
If products are identified, but have not been put away, you can click on the "Pending Putaway" button to look at those pallets and cases.

This is how the pop-up looks like. Users can click on the "Putaway" button for each pallet/case and then select a storage location to putaway.
Identify products
Users will identify and create inventory at pallet or case level by clicking on the "Receive/Putaway" button on each receipt line.

Users would then enter the Pallet Id and the quantity to create inventory at pallet level in the warehouse. If the item is case tracked, then the users would enter the Case Id to identify the inventory in the warehouse.

Putaway products
Once the pallet or case is created, the user would then click on the "Putaway" button to find the storage location suggested by Foysonis. Users would then take the product to that location and scan it to confirm the deposit. The user could override the system suggested location and scan their own location selection if they choose to.

Close the receipt
If the user has received all the products related to the receipt, the user would then close the receipt. Users will select the actions button and then select the 'close' menu option to close the receipt.

Shipping & Orders
Users will create orders and then plan it into shipments for allocating inventory in the
warehouse. Once the allocation is done, warehouse workers could complete the picking
process to move products from storage location to a shipment staging location. If the
product is being shipped on a truck, then it will be loaded to the truck and dispatched. For
parcel shipping, the products will be taken to the parcel staging area, shipping labels will
be printed and then sent using a parcel carrier.
The shipping process contains several steps that include processing a shipment until the
inventory is loaded to a truck or trailer and the truck is dispatched.
These steps include:
The shipping process involves the following steps
STEP
01
Planning orders to
shipments
STEP
02
Allocating and creating pick
work
STEP
03
Bringing the picked
inventory to the assigned staging lane after it is picked
STEP
04
Loading each piece of
inventory for the shipment(s) to the truck/trailer.
STEP
05
Printing the pack-slip or
BOL.
STEP
06
Dispatch the
trailer
Create Order
Users create orders by clicking on the "New Order" button and then entering the order number, shipped to customer, the item information and the requested quantity in order lines etc.

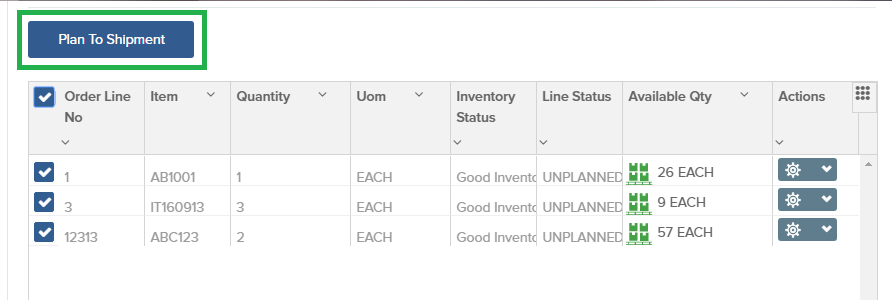
Plan to Shipment
Once the order is created, it needs to be planned into a shipment. Users will select the order lines and then click on the "Plan to Shipment" button to plan it to a shipment. It can be planned to a new shipment or be assigned to an existing shipment. If multiple orders go to the same customer, all of them can be easily planned into one shipment and shipped from the warehouse.
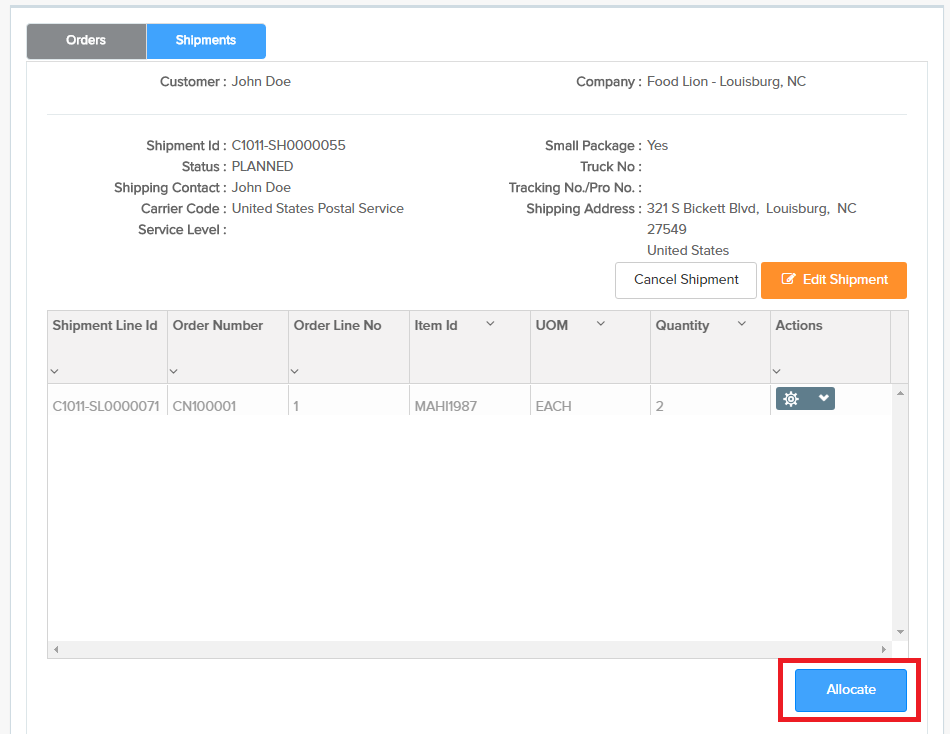
Allocate Shipment
Users will click on the "Allocate" button to create pick work to pick products in the warehouse to satisfy the request for inventory in the shipment. If the allocation is successful, the user can click on the "View Picks" button to look at the pick work created. If there are any errors in allocation, users will be shown the reason for the error.
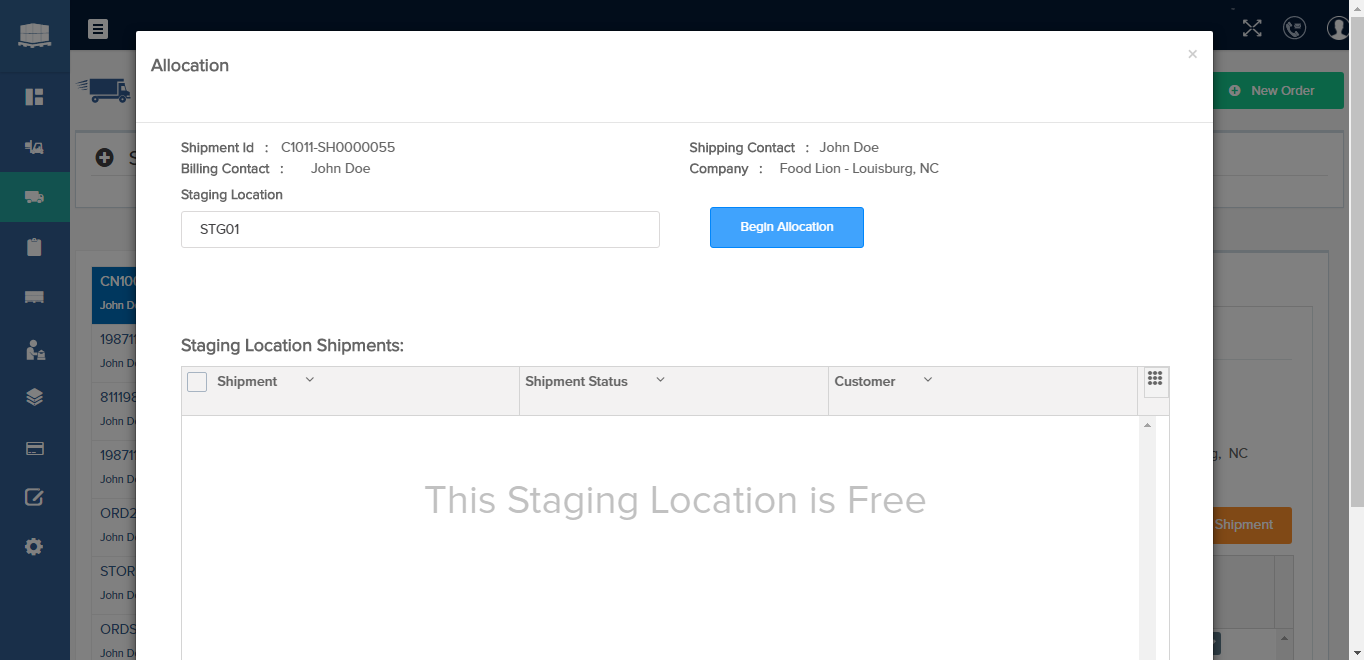
User selects staging location Once the user clicks on the "Allocate" button, a pop-up shows up like below and the user has to select a shipment staging location.
View Picks
Once the allocation is successful, the user can easily click on the "View Picks" button to look at the generated picks.

Clicking on the "View Picks" button will display the pick information as shown below.

Inventory allocation based on dates
When finding inventory, if the item is date controlled, a FEFO (First Expire, First Out) inventory must be selected. If the item is non-date controlled, then a FIFO (First In, First Out) inventory must be used. This will make sure that the warehouse is clearing the inventory in proper industry standards.
Shipping Dock
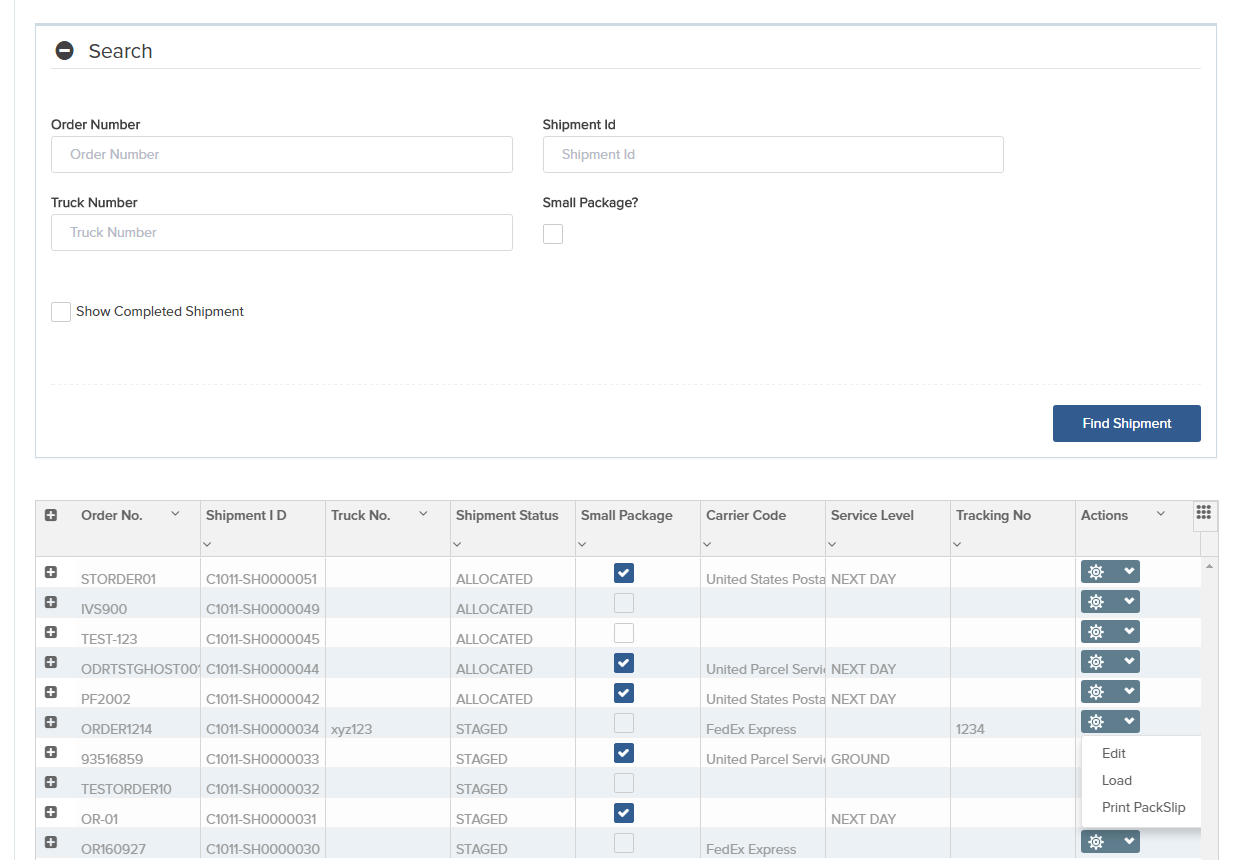
Once products are picked and shipments have been moved to a staged status, users can load the picked inventory to the truck, print paperwork and then complete the shipment process using the "Shipping Dock" screen as displayed below.
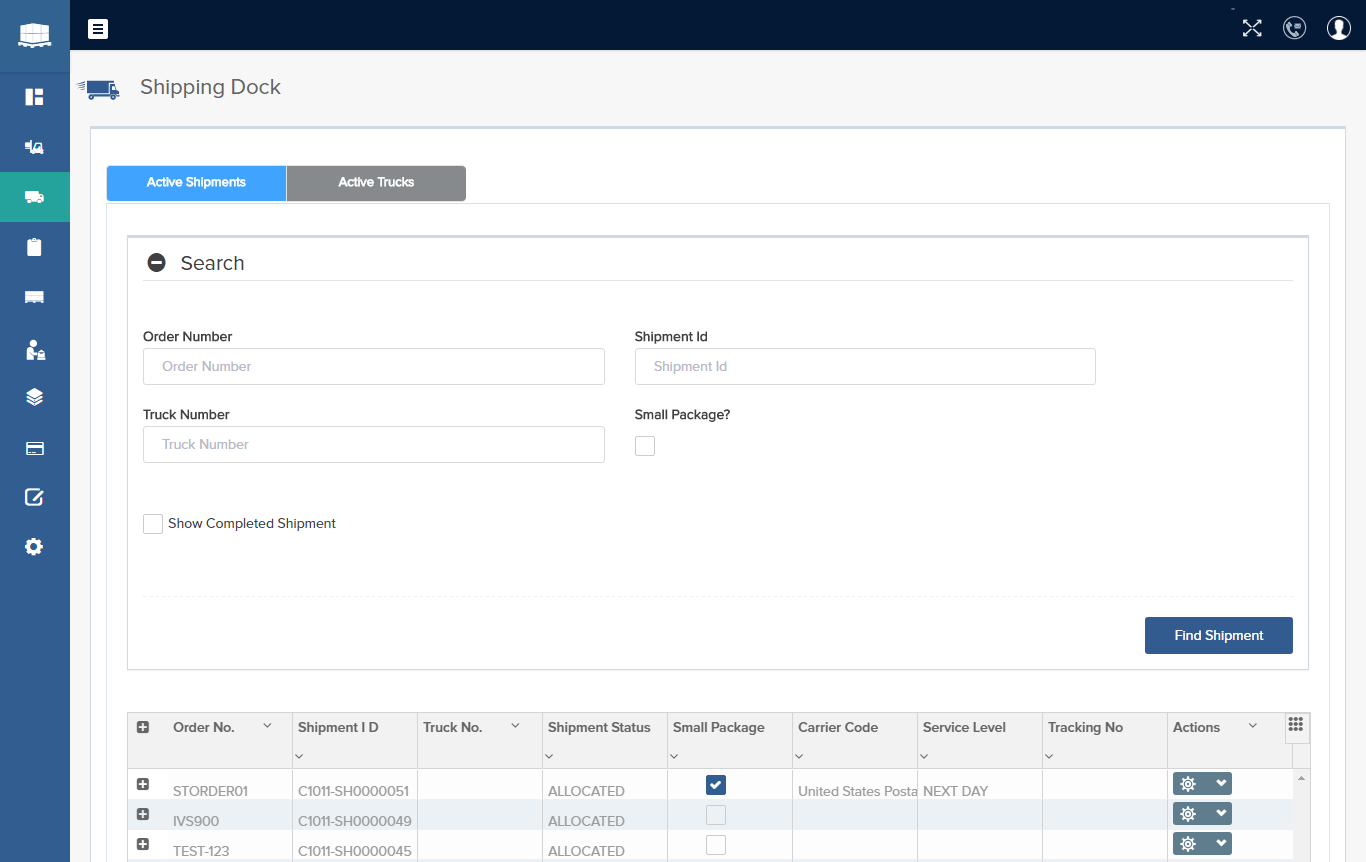
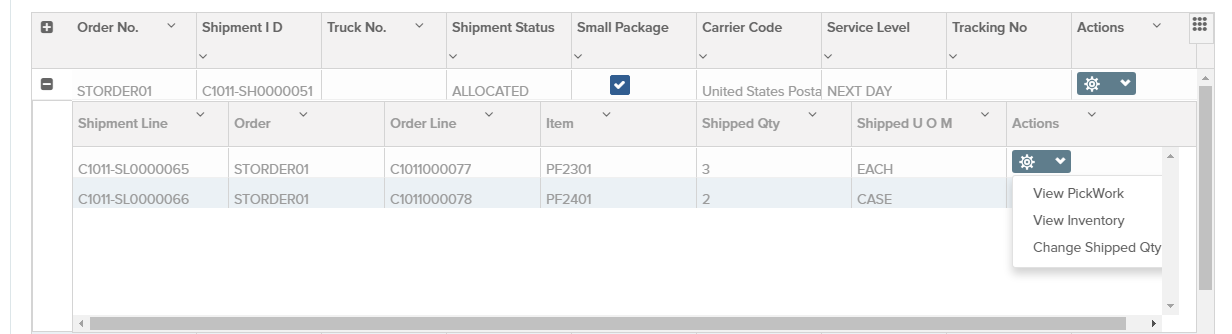
Active Shipments
The Active Shipments tab displays the active shipments by default. Active shipments means, any shipments currently in process in the warehouse. When displaying the details of the shipments, the system will display inventory that are picked for the shipment. Users can easily modify shipment quantity of a shipment line in case the shipping dock wants to short-ship the line.
Load products to trailer
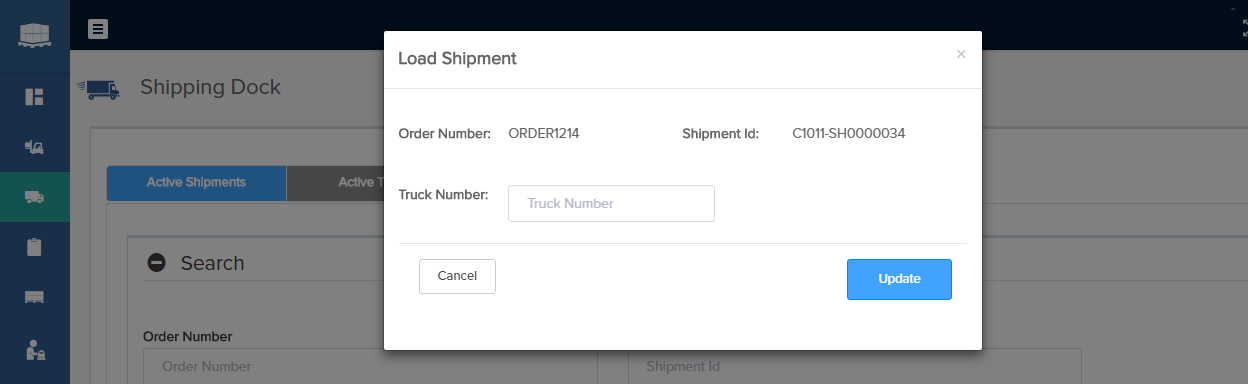
LTL/TL shipment must be first loaded before the shipment can be completed. Users will click on the "Load" action option to load inventory to the truck.
When the load button is selected, the user should be prompted to enter the trailer/truck number in a small pop-up. Once the inventory is loaded to the truck, the shipment goes to "Completed" status.
Print packing slip
Packing slips are printed per shipment basis. It contains information about what products are being shipped, the quantity of those products and the shipping address information of the customer.
Bill of Lading
The Bill of Lading document is a standard document for LTL/TL shipments. This document should be generated for each truck before it departs from a warehouse loaded with shipments. The users should be able to print the Bill of Lading documents after or at the time of closing the trailer.
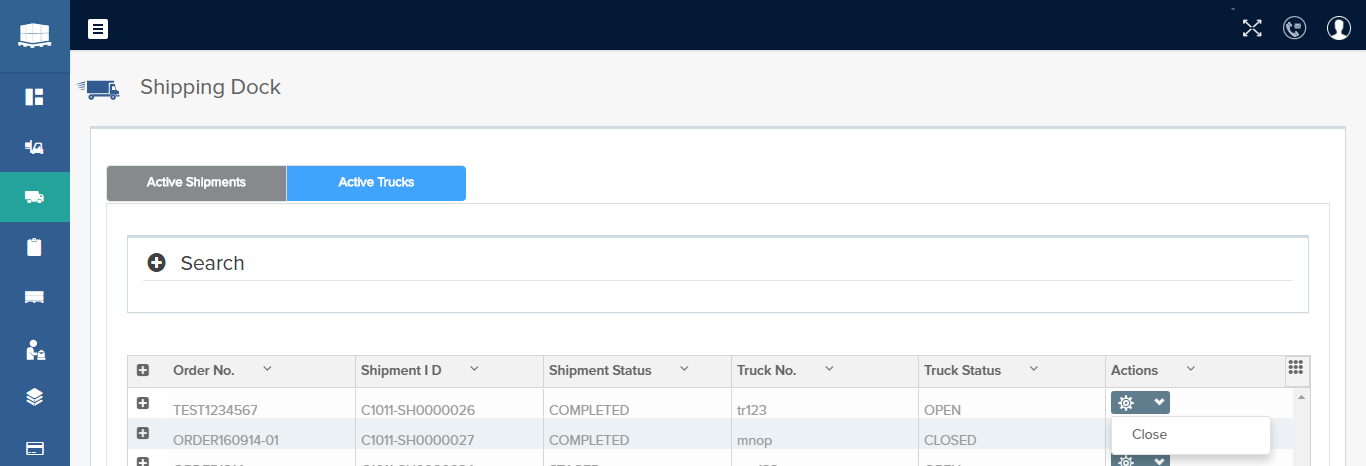
Active Trucks Dispatch
Active trucks are any trucks that are not dispatched, but have active shipments. Once the shipment is in completed status, all the products are loaded to the truck, the user can print the paperwork and then close and dispatch the truck.
Shipped Inventory
Users can search for shipped inventory from this screen based on item, shipment id, order number etc.

Picking
There are two main types of picking in Foysonis.
01
Pallet picking: Users pick
products by pallet
02
List Picking: User pick
products by cases or eaches
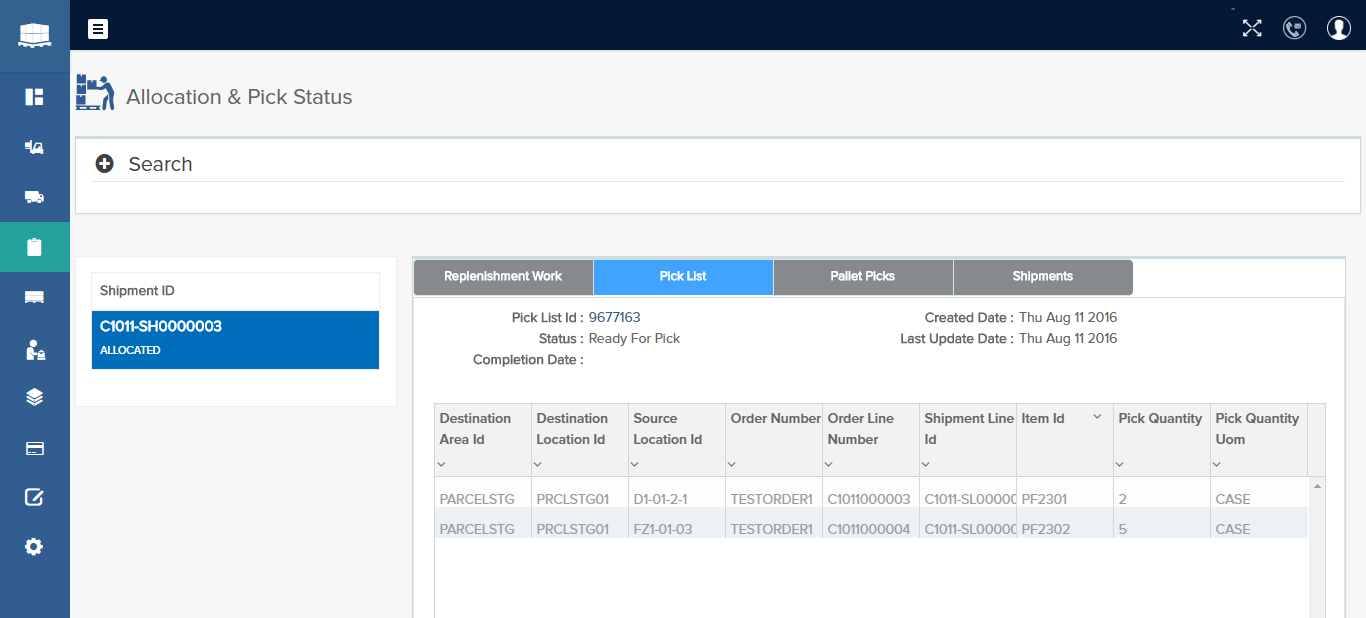
Allocation and Pick Status
System will display the status of picks for each shipment. For each shipment user can look at the pallet picks, replenishment, list picks and shipment details.
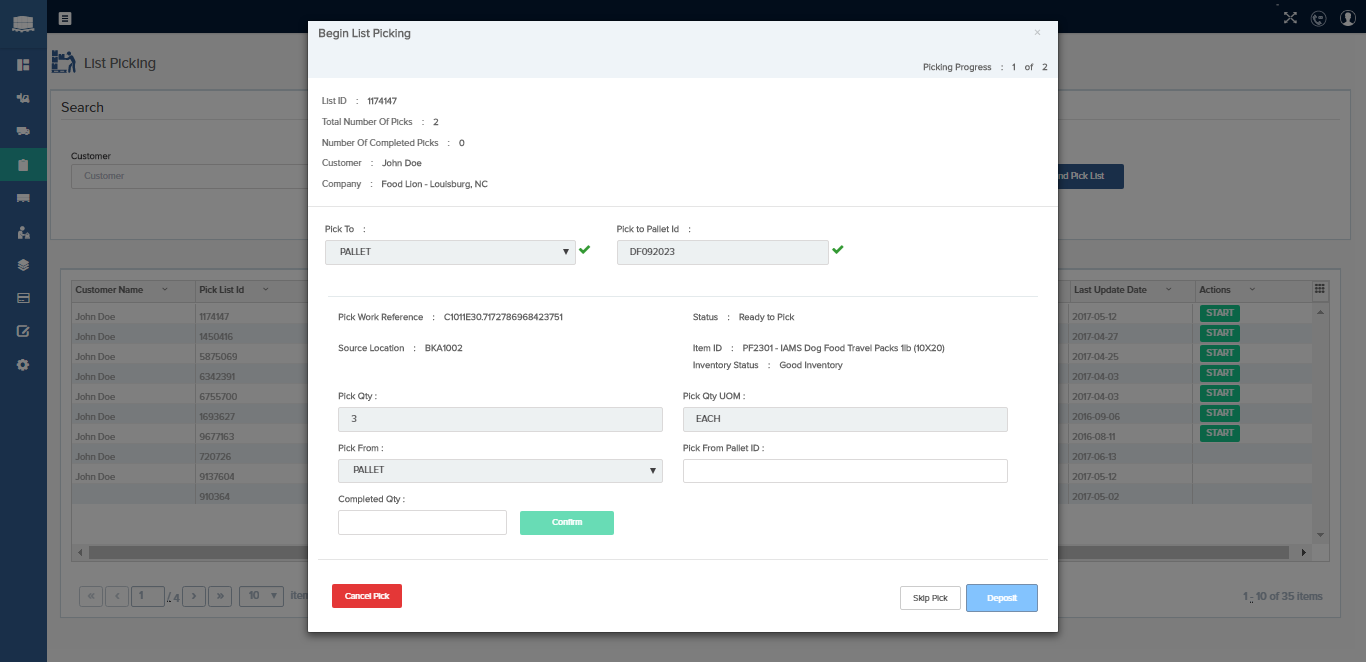
List Picking
Users can select the pick list to start the work by clicking on the "Start" button as shown below. List picks contain each and case picks.

Once you decide to pick to a pallet, then you confirm the picking operation in the screen as shown below where you will confirm the pick from Pallet/Case Id and the pick quantity.
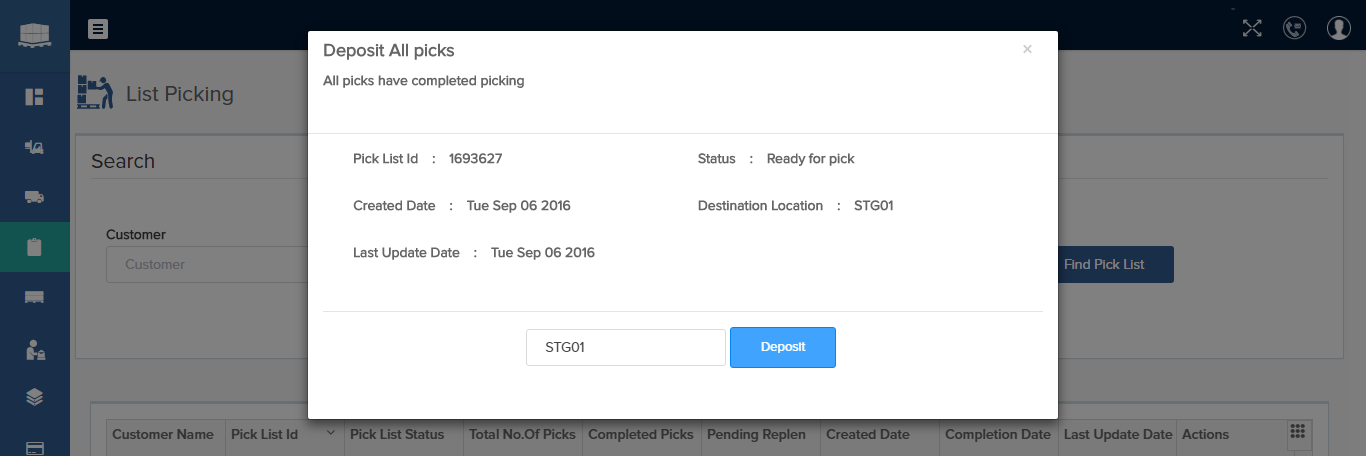
Once all the picks in the list has been confirmed, then the system will direct the user to deposit the products to the shipment staging location.
Pallet Pick
Pallet picks let users pick products in pallets and move to shipment stating location. Users start the pallet picking process by clicking the "Confirm" button.

Inventory
Inventory information is maintained accurately in Foysonis to perform fulfillment activities in a reliable and quick manner. Users can easily search for the inventory data based on various inventory attributes and also adjust the inventory data in the warehouse if there is a need for it.
View Inventory
The Foysonis View Inventory screen will let users view inventory in the warehouse. Users can search for inventory by item, Pallet or Case Id, location, area and additional inventory related fields.

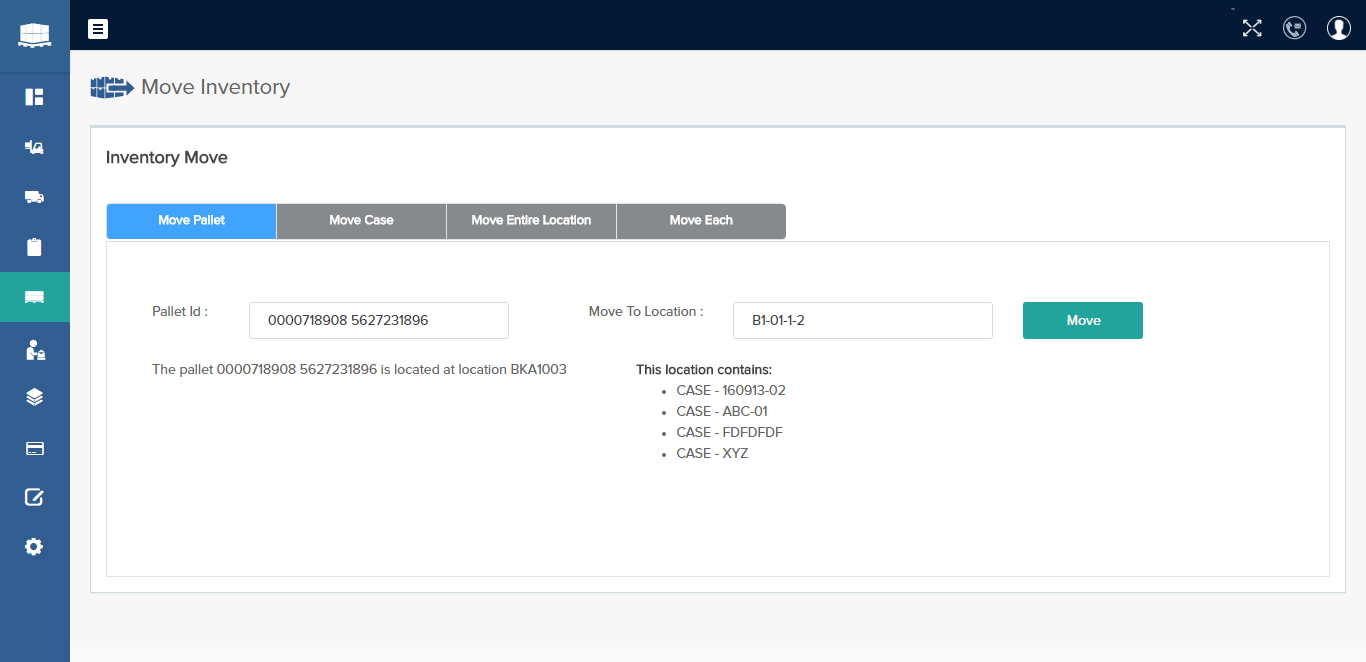
Move Inventory
Users will be able to move a pallet from one location to another, but the system will prevent/warn users if they try to move an inventory from a shipping staging or processing location other than its intended destination location. Users can move a case from one pallet to another, or from location A to location B. Users can move an each from location A to location B.
Adjustment Functionality
Users can add, modify and delete attributes of inventory in a location using the Inventory Adjustment screen.
